 24+ YRS EXPERIENCE IN THE 4WD INDUSTRY
  OVER 12,500 4WD PRODUCTS ONLINE
  20+ STOCKISTS AUSTRALIA WIDE
  SHIPPING AUSTRALIA WIDE & INTERNATIONALLY

If you load, tow or regularly tour in your 4WD, strengthening the chassis, especially around the rear coil towers and critical chassis sections, is one of the highest-value safety mods you can do. This guide explains why chassis bracing and coil-tower reinforcement matter, how the common failures occur, the difference between bolt-in and weld-on solutions, and practical advice for inspection, installation and long-term maintenance.
Strengthen Your Vehicles Back Bone
Let's Talk About Coil Tower Braces And Chassis Bracing
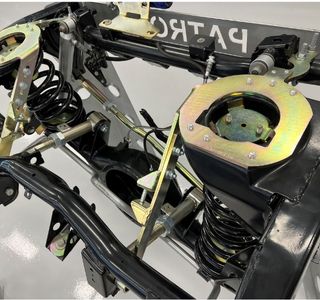
Why chassis bracing matters
When you load a 4WD (gear, passengers, a camper or trailer) the extra weight, repeated corrugated road impacts and towing loads concentrate at a few high-stress points on the chassis. Two common failure modes:
Coil tower uplift / buckling:
The rear coil spring mounts (towers) can be forced upward into the floor pan, deforming structure,
rubbing or rupturing brake and fuel lines and warping the body.
Chassis cracking at high-stress sections:
Modern IFS utes with thin channel rails can fatigue or crack around suspension mounts,
crossmembers or accessory mounting points when towing or carrying loads that aren’t well distributed.
Unchecked, these failures lead to leaking lines, unsafe braking, poor handling and very expensive repairs.
Typical failure signs - quick inspection you can do now
Before you fit springs or airbags, check the chassis visually:
- Look through the rear wheel arch. The top of each coil tower should be flat, horizontal and in line with the other side. If the top is bowed, buckled, or angled, the tower is already compromised.
- Inspect for cracking, paint crazing or distortion at suspension mounts, ladder-rail seams, or crossmember welds.
- Check fuel and brake line routing near towers for rubbing or chafe.
- Pressure wash and re-inspect for hidden cracks and rust blistering.
If you see any of these signs, don’t just fit stiffer springs, fix the structure first.


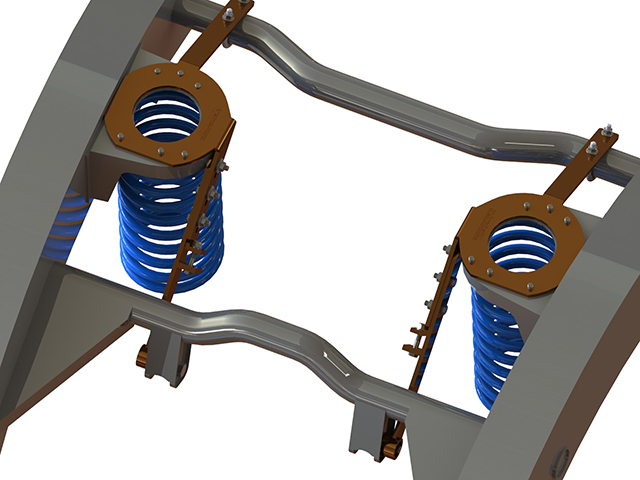
Coil tower braces, bolt-in vs patented adjustable solutions
Bolt-in (ute) pressed-section brace
A compact pressed-section brace for ute trays physically links both towers so the load is shared across a larger rear chassis zone. Benefits include:
- Fast install, no welding required.
- Often has cut-outs to route airbag lines or run with bolt-in coil drop cones.
- Raises and distributes load away from the tower tips.
Patented adjustable coil tower brace (wagon applications)
Where space is tight (wagon bodies, confined tubs) a CAD-designed, FEA-verified adjustable tower brace (patented design) is superior. Key advantages:
- Adjustability lets you correct partially bent or misaligned towers during install.
- Space-efficient CAD fitment for models where conventional braces won’t fit.
- FEA tested to validate that the brace increases load capacity substantially, in field testing these styles can offer up to five times the load capacity of lesser bolt-on kits (manufacturer figures vary by model and fitment).
- Built with mounting points and geometry to protect brake/fuel lines and to accept airbags or other accessories.
Important: bolt-on braces vary widely. Cheap kits that don’t provide line protection risk the nut or thread end chafing brake/fuel lines, a potentially catastrophic failure. Superior Engineering includes friction-resistant poly spacers in their ute kits to lift and protect lines.
Weld-on chassis brace kits - when & why to use them
A quality brace/kit should include:
- Fabrication from high-strength steel (manufacturer will often specify 350-grade or equivalent).
- CAD-designed fitment parts (ensures clearance and correct geometry in tight spaces).
- FEA (finite element analysis) load validation or empirical testing showing improved load capacity and stress distribution.
- Durable surface finish (SA5 Zinc) to prevent corrosion behind the plates.

Installation best practice (bolt-in & weld-on)
Bolt-in brace installation:
- Verify tower/crossmember faces are clean, undamaged and flat.
- Trial-fit the brace and check clearance for fuel, brake and airbag lines. Fit provided poly spacers where required.
- Torque bolts to manufacturer spec and use thread locking or double-nut where specified.
- Cycle the suspension through full travel and re-check fastener torque after initial settling (100–200 km).
- Reinspect lines and fittings for chafe.
Weld-on brace installation (summary):
- Assess and document existing damage; plan repair to original geometry.
- Use pre-cut/shaped reinforcement plates matched to the chassis.
- Welding must be performed by a certified structural welder; follow the relevant standard (e.g. AS1554 series in Australia).
- Post-weld stress relief or anti-corrosion prep as recommended; paint/powder coat all exposed steel.
- If structure had been repaired, get the work certified/inspected by the relevant authority before returning the vehicle to road use. Notify your insurer.
Airbags, heavy-duty springs and why they aren’t a structural fix
Airbags and stiff springs reduce rear sag under load, but they do not distribute the resulting load into a structurally sound chassis, they simply move where the forces act. If the chassis or towers are weak, the extra force can accelerate buckling, cause cracking or burst lines.
Always pair ride-height / load support upgrades with appropriate chassis strengthening where required. Think of airbags/springs as ride management, braces and welds are structural safety.

Maintenance and inspection schedule
- Before any heavy trip: visual inspection (towers, welds, lines, fasteners).
- After 200–500 km on a new installation: re-check all bolts and fasteners, inspect for movement or cracking.
- Annually or after rough seasons: lift and inspect under rail surfaces, re-paint exposed steel, check for corrosion around welds.
- After impact or heavy overload: immediate inspection, look for deformation, cracked welds or line chafe.
Legal & insurance considerations
Structural welding and chassis modification may affect roadworthiness certification and insurance. Always check state/territory regulations and inform your insurance provider before completing structural work.
Have welds and repairs certified if requested by authorities, this protects you when registering or after a claim.

Summary - why chassis bracing should be high on your upgrade list
If you tour, tow or load your 4WD, strengthening the chassis and coil towers is not optional, it’s a risk-management decision. Braces and weld-on reinforcements stop small problems becoming catastrophic failures: they protect brake and fuel lines, stop body distortion, preserve geometry and make suspension upgrades (springs/airbags) safe and effective.
When choosing a solution:
- Inspect first. Repair or reinforce before adding springs or airbags.
- Use CAD/FEA validated parts where possible.
- Protect lines with poly spacers or dedicated routing.
- Get certified welding and approvals when structural welding is performed.
- Schedule post-install checks and periodic inspections.
For serious touring and heavy-use vehicles, a correctly designed coil tower brace or chassis reinforcement is one of the best investments you can make, it protects safety, functionality and resale value.
For More Information - Call Our Sales Team On
(07) 5433 1411